
|
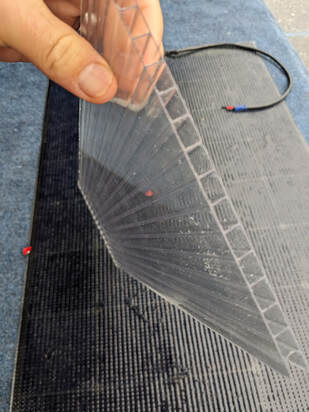
eSolar cell output degrades and the cell heats up. A solar panel power rating is established at standard test condition (STC) of 77 degrees Fahrenheit and at 1,000 W/sq meter of light. At 135 degrees Fahrenheit, a typical solar panel will degrade in performance by at least 10%. It is not uncommon for a solar panel to reach 170 degrees in full sun on a warm day. So, it is beneficial to solar panel performance to cool the panel as much as possible. One way to accomplish this is to place 4 or 6 mm twinwall polycarbonate under the panel. This enables some airflow under the panel thus cooling the panel. Twinwall polycarbonate is often available at Home Depot or Lowe's or online. Twinwall polycarbonate can also be used under a flexible pane on bimini canvas installation where the panel is going over a support tube. This takes the pressure off the solar cells caused by bending at the support tube. The panel and twinwall polycarbonate can be attached to the supporting surface using the CMP bolt on system or for semi-rigid panels the J extrusion system. Bonus water heating idea:. 8 mm twinwall polycarbonate will accept 1/4" irrigation tubing. The tubing can be run through the twinwall polycarbonate and attached to a small pump and the boat water heater. Circulating water through the tubing under the panel will both cool the solar panel and heat the water in the hot water tank. Free warm water! See our water heating section on the website for further ideas on how to install such a system.
0 Comments
We introduced the advantages of our shade tolerant solar panel design in an earlier blog post. Our original design had the junction box in the middle of the shade tolerant panel. Many of our customers asked us to try and figure out ow to put the junction box at the end of the panel just like our standard flexible solar panels. I am pleased to announce that we have perfected a design that provides the magic of the four quadrant system with the junction box at the end of the panel. These new panels are becoming available in most all of our flexible panel sizes. See the diagram below for an illustration of these new panels. Patent pending We are asked quite often if these shade tolerant panels really make a difference or are they a gimmick. I appreciate the question because it seems too good to be true. The fact is that we have extensively tested these panels against our standard panel design in all sorts of shading conditions and we have documented an average of 30% higher output with the shade tolerant design. In some cases, like boom shading across the entire panel, we have documented a 50% difference in performance between our standard panel and our new shade tolerant panel. Contact us anytime to discuss the advantages of these innovative solar panels. 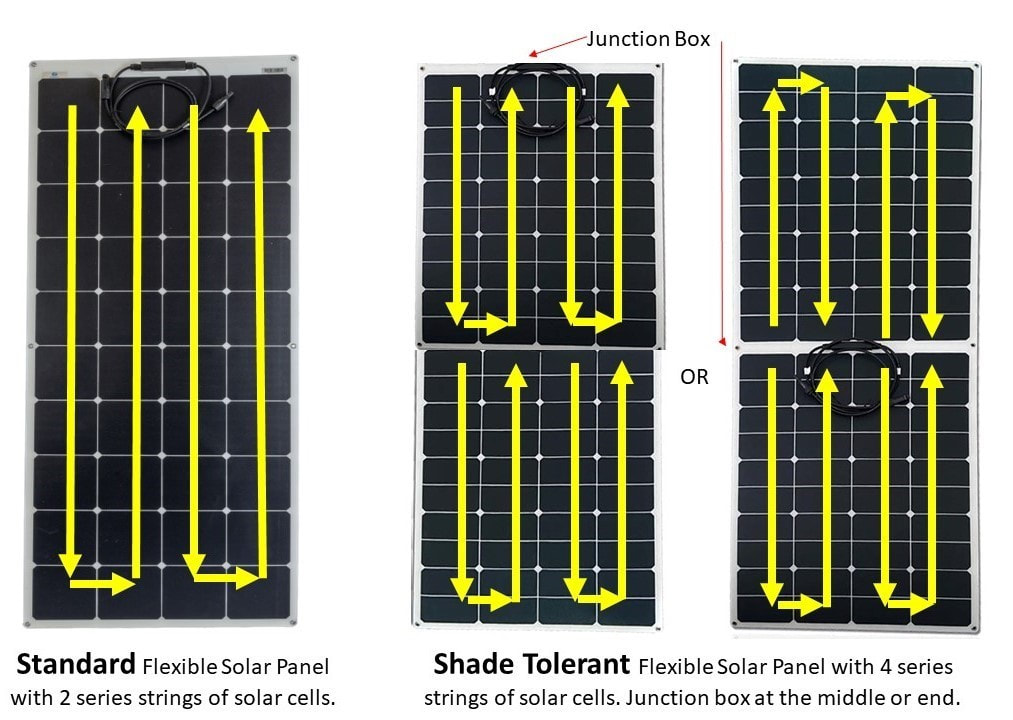 When wiring three or more solar panels in parallel, it is advisable to install a 10 or 15 amp inline fuse on the positive wire of each panel. Should one panel fail or short out, that panel's fuse would blow and prevent the power from the other panels from entering the shorted panel thus preventing excessive heating of the shorted panel and prevent the other panels from failing due to excessive current. This can be accomplished easily using an MC4 inline fuse holder plugged into an MC4 T-branch. These fuse holders are available on Amazon or other website. Below is a wiring diagram illustrating such an installation. 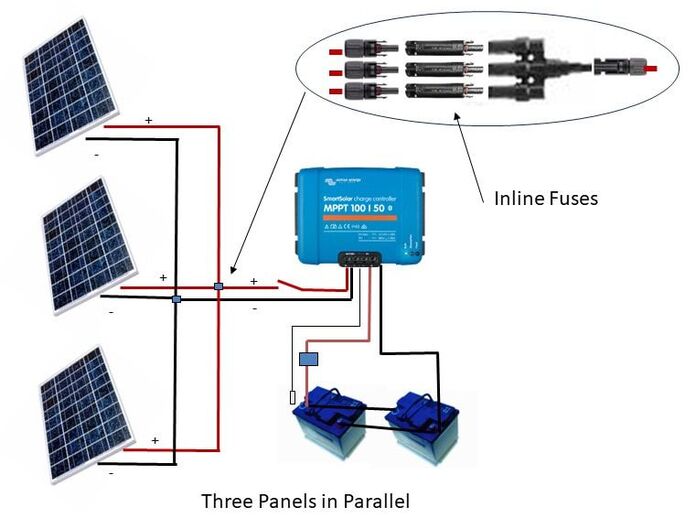 Most of us have shading on our boats from rigging, equipment poles or other boat structures. Reduction in performance due to shading is a significant issue for solar panels. We at Custom Marine Products have developed a new panel design that significantly reduces the impact of shading and clouds on solar panel performance. First, a bit of background on how typical solar panels are designed. Solar cells are wired in series to get the panel voltage up to a level that is appropriate for its application. These series strings usually go down and up the length of the panel. A solar panel may have one to 5 series strings. Higher quality solar panels have the cell strings isolated with diodes so a shaded string does not reduce the performance of unshaded strings. If there is shading across the panel, each shaded series string is significantly reduced in power output. Our new CMPower shade tolerant solar panel is designed with multiple shorter strings of half-cut solar cells. These flexible panels have four strings (four quadrants) all isolated with diodes. The result is a panel that will perform well with boom shading across the panel. In fact, our testing indicates that these panels have double the output of a standard panel in shaded conditions. These panels are currently available in 115 watt and 145 watt sizes. The junction box and wires are in the center of the panel rather than at an outside edge. This may be problematic for some installations. See diagrams below for clarification. 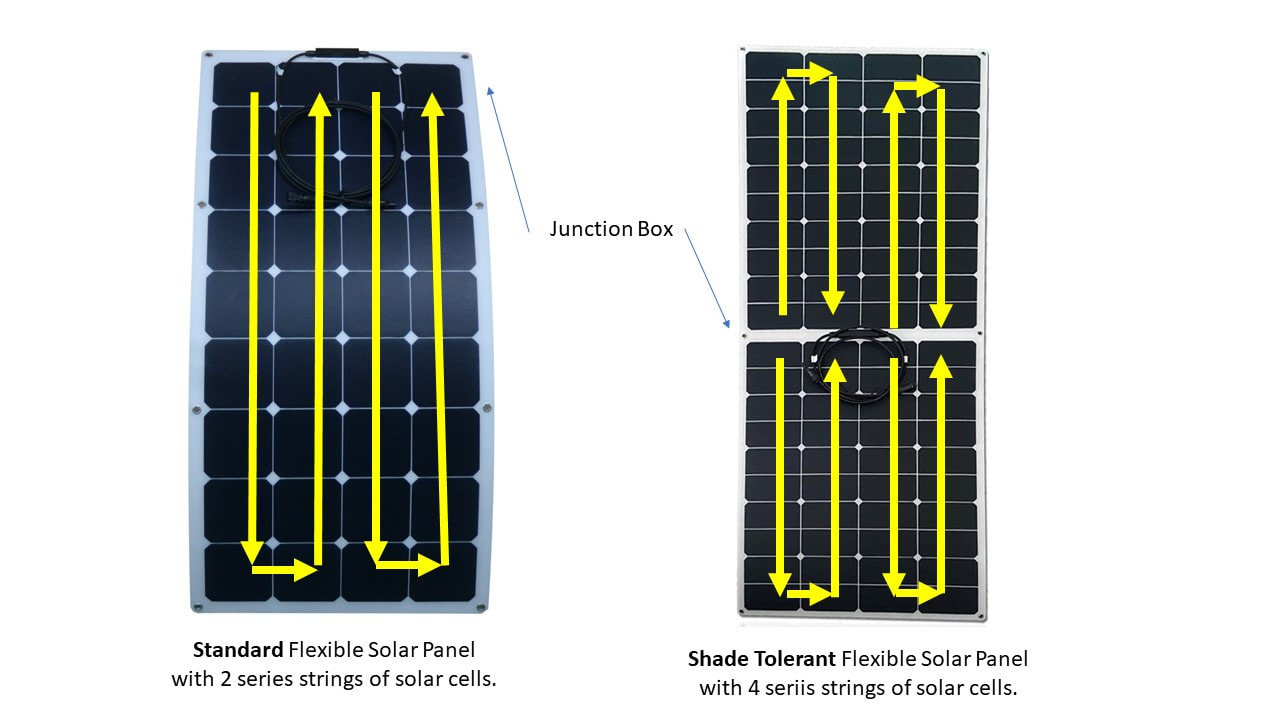 We are often asked if there is a way to keep a lead acid start battery and install LiFePO4 batteries for the house and charge them from the same alternator. The answer is generally yes. Lead acid or AGM batteries should never be combined with LiFePO4 batteries. These are totally different battery technologies and they are not compatible. Thus, a battery combiner is not an option. Here are two alternatives for charging both battery banks from a single alternator. A DC-DC charger enables two battery banks to be charged from a single alternator while being isolated from each other. The Victron Orion DC-DC charger is an excellent option. It enables the start battery to be charged directly from the alternator and at the same time charge the LiFePO4 house battery bank with a different charging profile. The advantages of this approach include: – Multiple batteries of different types can be charged independently. – Multiple battery charging profiles. – Easy to install and monitor – Protects the alternator – Multiple Orion units can be wired in parallel for higher power charging. The Orion is available in two types; isolated and non-isolated. The isolated unit is designed for unit in boats or vehicles with battery banks that do not have a common ground. The non-isolated unit is designed for boats or vehicles that have a common ground. Most boats are wired with a common negative ground throughout so a non-isolated Orion unit is appropriate for most marine applications. Below is a wiring diagram for a single Orion DC-DC charger with two battery banks: 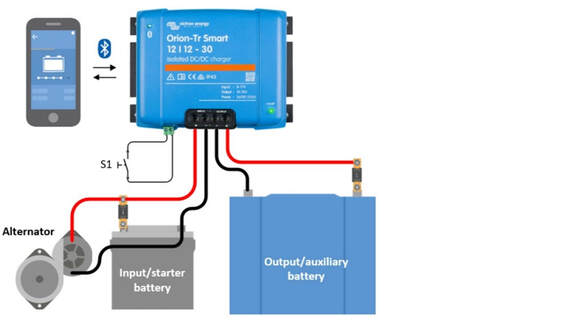 A battery isolator enables the charging of multiple battery banks while keeping them isolated from each other. The Victron ARGO FET Battery Isolator enables the charging of three battery banks. The disadvantage of this approach is that there is a single charging profile applied to all three battery banks. Thus, if the start battery has a significantly different charging profile from the LiFePO4 battery bank, this may not be a good option. Advantage – multiple batteries can be charged independently. Disadvantage – only one battery charging profile. 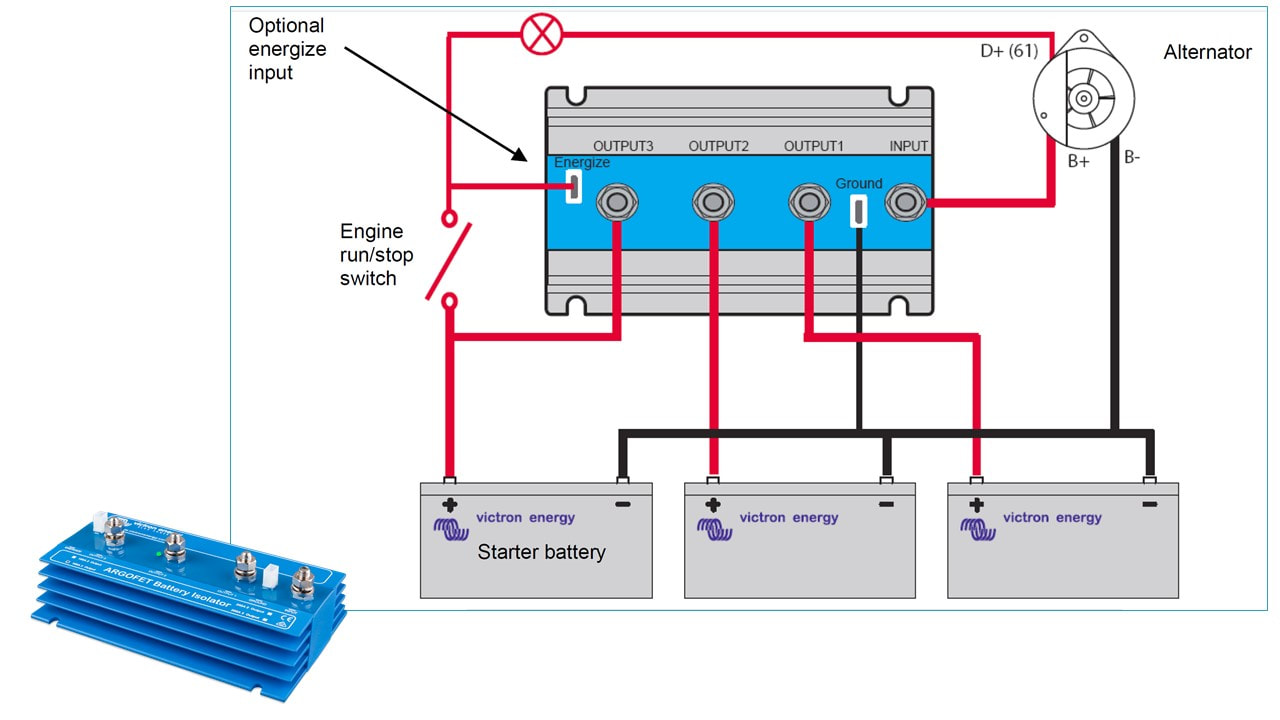 The fuse between the battery bank and the controller is an ABYC wiring standard requirement. Everything between the battery bank and an appliance must be fused to meet the standard and pass boat inspection.
To determine the size of the fuse needed for the solar system, do the following calculation: Watts of solar /12V (or 24V) = amps + 10 amps. For example: 240W solar / 12V = 20 amps +10 amps = 30 amp fuse. Also, many controllers have a built in fuse as a secondary protection. The protection is against a short circuit overheating the wires to cause a fire. There is no reason for a fuse between the solar panels and the controller although many customers use a circuit breaker there for the switch. To calculate the capacity of the switch: Watts of solar / Voc (open circuit voltage) = amps For example: 240W solar / 30V = 8 amps. Note the much lower amperage on the solar side of the controller vs the battery side of the controller in the examples above. That's MPPT. Panels never surge power unless hit by lightning. .A solar system will typically be putting out 10-30 amps to the battery bank. An alternator will typically be putting out 45 - 200 amps to the battery bank. So you want everything you can get from the alternator when the engine is running. Sometimes, on some boats, the alternator will sense the net voltage of the battery bank plus the voltage from the solar controller and see a higher voltage than the actual voltage of the battery bank. This may cause the alternator to prematurely go into the float charge phase which is low amps. Thus, the batteries are not getting the full charge from the alternator. When this happens, you use the switch between the solar array and the controller to turn off the solar so you get full power from the alternator.
How do you know if the alternator is going into float mode prematurely? You see it on the amp meter or the battery monitor if the boat has one. Otherwise it is difficult to tell. This is the only reason to shut off solar with the switch. The switch is between the solar panel and the controller because the controller is powered by the battery, not the solar panels and you want to keep power to the controller rather than reboot it all the time. There is no harm in having solar, generator, shore power or alternator connected at the same time. Another consideration: If the batteries are low, it is unlikely the net of the battery voltage and the solar is enough to move the alternator to float mode. This only happens when the batteries are nearing full charge and it is midday and the solar is putting out a full charge. It happens on our boat only under these conditions. Then there is the difference in charging voltage of lead acid and LiFePO4 batteries. It would seem more likely to happen with LiFePO4 batteries since the charge curves are at a higher voltage. One of our customers was getting less than 20% of the rated power from his solar panels and he called us for help. He had 400 watts of solar, was using a Victron MPPT controller and two CMPower 120 Ah LiFePO4 batteries. He should have been getting 25+ Amps of charging power from the controller to the batteries but was only getting 4 Amps. We spent several hours troubleshooting; charging and discharging the batteries, testing the solar panels reprogramming the MPPT controller all to no avail. He texted me a picture of his installation and happened to mention he was temporarily using a 25 foot long 12 gauge wire between the controller and the batteries. I suggested he try a short 10 or 8 gauge wire and see what happens. Magically, the system began to work perfectly. I reproduced the same situation in our shop and achieved the same results. The bottomline: The wires between the controller and the battery bank MUST be adequate to handle the load otherwise the performance of the solar system will be severely restricted. Don't skimp on the wire. The same applies for the wire from the solar panels to the controller.
Custom Marine Products now sells and supports inverters and inverter.chargers made by Victron and EP Solar. The following explains the difference between inverters and inverter/chargers. For more information on this topic check out our web page on inverters under our Products section.
Inverters - The purpose of an inverter is to supply power to AC appliances (such as a coffee maker or microwave) by inverting DC battery power to AC power. An inverter draws power from the battery bank and supplies it to AC appliances. Inverters are available in various sizes measured in watts of output. The most common inverter capacities range from 1,500 watts to 3,000 watts. Most inverters are about 80-90% efficient which means 80-90% of the power drawn from the battery bank is converted to AC power. Inverter/Chargers - The purpose of an inverter/charger is to both supply power to AC appliances from the battery bank and to charge the battery bank from grid power or a generator. In summary, invert DC to AC current for powering appliances and invert AC to DC current for charging the battery bank. Most inverter/chargers are equipped with an automatic transfer switch (ATS). When grid or generator power is applied to the inverter/charger, the ATS bypasses the inverter and passes the AC current through to the AC appliances and also connects to the built in battery charger to charge the battery bank. When grid or generator power is turned off or removed from the inverter/charger, the ATS automatically disconnects the battery charger and connects the inverter so the AC appliances are powered by the battery bank. First some background - solar controller I look at the solar controller as a negotiator of sorts. It uses MPPT (Maximum Power Point Tracking) to determine the best combination of voltage and amperage to pull the maximum power (Watts) from the solar panels. The MPP will continually vary depending on the panel design, sun angle and shading. The solar controller also senses what is the best voltage and amperage combination (Watts) for the battery bank. V x I = Watts. Watts into the controller from the solar panels about equals watts out to the batteries minus conversion efficiencies. So the solar controller negotiates the best power from the panels and best power to the batteries. While the solar controller senses the voltage of the batteries to determine how much power to supply to them (charge), it has no way of sensing what has been or is being taken out of them (discharge). Some more background - LiFePO4 batteries The discharge curve for LiFEPO4 batteries is very flat. They supply a steady voltage of between 13 and 13.4 volts up until 95% of full discharge. This is unlike lead acid batteries that reduce in voltage from 13 to 11 or less volts as they discharge. Thus, voltage only is not an accurate way to determine the state of charge (SoC) of LiFePO4 batteries. Determining LIFePO4 battery SoC There are two ways to determine the SoC of LiFePO4 batteries; an external battery monitor or information directly from the Battery Management System (BMS). A battery monitor (Victron makes one) has a shunt on the negative wire between the batteries and the battery chargers and appliances using power. The battery monitor measures the power crossing the shunt in both directions (charge and discharge) and computes the State of Charge of the battery bank. This technique can be reasonably accurate but most battery monitors are designed for lead acid and AGM batteries and have to be reprogrammed for LiFePO4 because LiFePO4 batteries charge so much more efficiently than lead acid. The battery monitor has enough data to compute the SoC but can be inaccurate because battery charging efficiencies vary. The diagram below may be helpful. A well designed battery management system (BMS) can measure the charge and discharge rate and the battery voltage and accurately compute the SoC for each battery in the bank. The BMS can also compute the time to full charge and the time to full discharge. In addition, the BMS monitors and manages the SoC of each of the 4 cells within a LiFePO4 battery so it can provide diagnostic data to identify a potential balancing issue which could lead to a potential failure. All this information can be made available through a well designed BMS Bluetooth App. 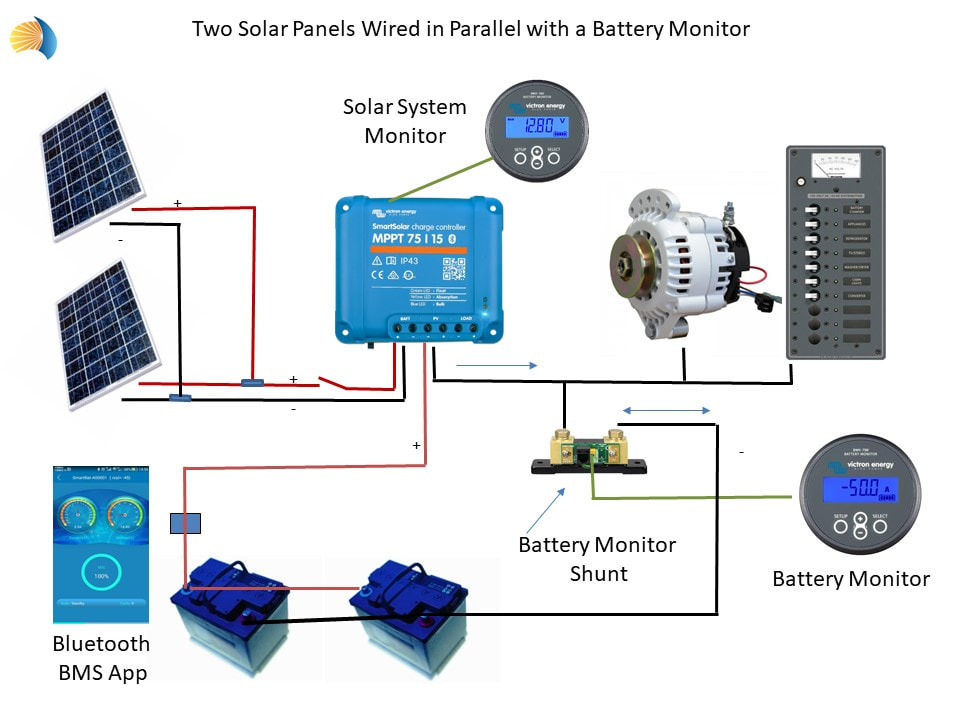 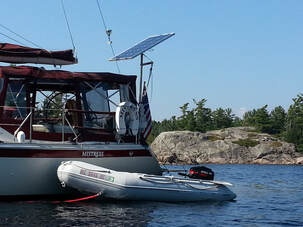 175 Watt PV Solar Panel on a Pole 175 Watt PV Solar Panel on a Pole This year we again tested our CMP 175 Watt SunPower cell solar panel with our integrated water heating system on a 4 week cruise in the Canadian waters of Northern Lake Huron. The area is known as the North Channel and is at a latitude of about 46 degrees. The 175 watt panel provided the power necessary to meet our 70 amp hour per day requirements. Our CMP pole mounting system enabled me to tilt and rotate the panel to achieve optimum sun angle. I set the sun angle once and rotated the panel three times a day (morning, midday, evening) and estimate we got about 30% more performance over a fixed horizontally mounted panel. When more power was needed to bring up the batteries, I would tilt the panel to capture the maximum possible sunlight. We used an EP Xtra-N 20 amp MPPT Controller (same as last year) to manage the solar charging and to capture solar system performance data.
Operating statistics: Our power usage averaged approximately 70 amp hours or 850 watt hours in a 24 hour period. Our appliances at anchor included a laptop computer several hours a day, refrigerator/freezer running 24/7, cell phone chargers, our LED lights in the evening, and our radios and instruments during the day. We have a 75 amp Balmar alternator with a smart regulator. We are using two 100 amp hour CMP LiFePo4 batteries for our house bank and one for our starting battery. This is the second year for the CMP LeFePO4 batteries and they again performed beyond our expectations. Results and findings: 1. Even running the ice maker late in the day, our LiFePO4 battery bank was fully charged by 2 PM most sunny or mostly sunny days when at anchor; about the same as last year. 2. The EP Xtra-N MPPT controller with the remote display proved to be an excellent piece of equipment. On occasion we disconnected the remote meter and plugged in the BLE Bluetooth dongle to monitor the solar system from our phones and tablets. Both monitoring techniques worked well however the meter captured more cumulative data such as watt hours produced so I used it more. It was interesting to watch the solar system pouring in as much power as available to recharge the LeFePO4 battery bank then pull back in the afternoon when the batteries reached full charge. There is no need for a float charge phase with these batteries. 3. Rotating the panel during the day to achieve optimum sun angle, especially in the morning, significantly increased the power generation of the panel. When we would leave the boat for extended periods for exploring and kayaking I would tilt the panel to the near horizontal position. 5. The data gathered confirmed that this panel configuration supplied all the power we needed on sunny days and had sufficient capacity to catch up on battery charge after a string of cloudy days; although sometimes it took a day or two to fully catch up. 6. The panel was affected by shading as would be expected. Occasionally the panel was shaded by the back stay or the mast. While the shading was minimal, it degraded the performance by up to 40%. Panel performance degraded by over 70% on heavily cloudy days. 7. The heat exchanger on the back of the panel for our water heating system worked well on sunny days so we had warm water for showers and dish washing. Power consumption of this system was minimal. Data: This year - 2019 175 Watt Solar Panel At anchor Motor Sunny to Cloudy to Mostly Sunny Mostly Cloudy Average watt hrs per day 766 495 930 423 Average amp hours per day 59 38 72 32 Maximum watt output in 24 hours 1,130 810 1,130 810 Maximum amp hours in 24 hours 87 62 87 62 Last year - 2018 175 Watt Solar Panel At anchor Motor Sunny to Cloudy to Mostly Sunny Mostly Cloudy Average watt hrs per day 750 480 900 435 Average amp hours per day 58 37 69 33 Maximum watt output in 24 hours 1,280 750 1,280 570 Maximum amp hours in 24 hours 98 58 98 44 Observations: 1. The minimum watt hour output doesn't mean much because it is dependent on both the cloud cover and the state of charge of the bank as a result of alternator charging, 2. The maximum watt hours per day of 1,280 is not the maximum output capacity of the system in a 24 hour period because the batteries were charged by 2 PM so the controller shut down the charge from the panel. A higher drain on the house battery bank would have resulted in this number being higher. 3. Average amp hours per day is computed by dividing the watt hours by 13 volts. This is a ballpark calculation. 4. We did not use shore power to charge the battery bank for the entire cruise.  Average 5 Sun Hours in a Day Average 5 Sun Hours in a Day High quality high performance solar cells will produce more power at various sun angles than lower quality solar cells; up to 30% more power. An important consideration in determining how much solar power you need is how many watt hours or amp hours of power you can expect to generate in a day. Let's say you cruise in an area that receives an average of 5 hours of full sun a day. The average is computed based on the seasonal sun angle and the sun angle from morning through evening. A 100 watt solar panel with average efficiency solar cells may produce 100 watts x 5 hours or 500 watt hours of power in a day. At 13 volts that's about 38 amp hours in a day. A 100 watt panel with high efficiency solar cells will produce up to 30% more power in a 24 hour period or 100 watts x 6.5 effective hours or 650 watt hours of power in a day. At 13 volts, that's about 50 amp hours in a day. 38 amp hours vs. 50 amp hours in a day is significant on a boat. Add more panels in the mix, say 300 watts and we see 114 amp hours vs.150 amp hours, a difference of 36 amp hours. This simple analysis does not take into consideration the impact of clouds or shading both of which will make the disparity even greater. Clearly, the higher the quality of the solar cells the more power produced over time.
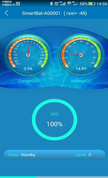 Bluetooth battery monitor app Bluetooth battery monitor app This year we replaced our lead acid batteries with LiFePo4 (Lithium Iron Phosphate) batteries. We wanted to learn how this technology functioned in a marine cruising environment and analyze how this technology operated with our solar system.
Battery Configuration - After considerable research, we selected a 100 Amp Hour (Ah) battery manufactured to our specification with a 150 amp draw Battery Management System (BMS) and Bluetooth capability. We worked closely with our manufacturer to design the best battery for the marine environment. We replaced our house bank of three 110 Ah lead acid batteries with two 100 Ah LiFePo4 batteries and replaced our 110 Ah lead acid start battery with a single 100 Ah LiFePo4 battery. We have three charging systems onboard; a 75 amp Balmar alternator with smart regulator, a Xantrex 55 amp inverter/charger for shore power and a 175 watt solar system with an EP Xtra-N Li capable solar controller. We have a Link 2000 battery monitoring system. We were able to replace our three battery house bank with two LiFePo4 batteries because the LiFePo4 batteries can be safely discharged 90% (180 Ah) whereas the lead acid can be safely discharged only 50% (165 Ah). Findings Summary - These batteries performed beyond our expectations. They took everything we could throw at them through heavy charging and discharging. They proved to be plug compatible with our existing charging systems and compatible with our onboard appliances. The only disadvantage we could come up with is the cost but this is mitigated by the life expectancy of these batteries. We will keep these batteries onboard for a long time. Below are some specifics on our observations. Bluetooth - The Bluetooth capability enables real time monitoring of each battery through an app on a smartphone. The system displays the state of charge of the battery, the amp draw and voltage level, the temperature, the time to full charge and the number of charge/discharge cycles. We found this feature to be valuable in monitoring the performance and characteristics of each battery in the battery bank. It was almost equivalent to having a built in battery bank monitoring system like our Link 2000. Charge/discharge cycles - The LifePo4 batteries have an expected life of 3,000-4,000 charge/discharge cycles at a discharge to 90%. Lead acid batteries have an expected life of 300-400 charge/discharge cycles at a discharge to 50%. During our 6 week cruise we never plugged into shore power and the BMS recorded only 11 cycles. I'm not sure what constitutes a cycle but will research this in the coming weeks. See my earlier blog post for a description of our power usage profile. Discharge profile - The two battery LiFePo4 house bank discharge profile is significantly different from a lead acid bank. The LiFePo4 bank stayed between 13 and 13.4 volts up to our maximum discharge which was about 75%. We anticipate the bank voltage would have dropped off rapidly at about 90% discharge. A lead acid battery decreases in voltage as more current is drawn. The contrast in voltage drop seemed significant in the performance of our refrigeration (our major appliance). It ran at peak efficiency all the time. While difficult to quantify, it appeared our power consumption in a 24 hour period was less with the LiFePo4 batteries than last year with the lead acid battery bank. Discharge rate - The BMS built into these batteries has a 150 amp discharge capacity. This means the batteries can sustain a heavy discharge without damage or degradation. Our manufacturer has advised us that the quality of the cells and quality of the BMS is key to the longevity and performance of a LiFePo4 battery. We have seen this firsthand. Weight - Each 100 Ah battery weighs about 31 pounds. A comparable lead acid battery is about twice that. We replaced a four battery lead acid battery system weighing over 200 pounds with a three battery system weighing 93 pounds. Safety - Li batteries have a reputation for catching fire. Not so with LiFePo4, a very different technology. The built in Battery Management System monitors the state of charge of each cell group and controls the charge and discharge rates. These batteries have two major components, the LiFePo (Lithium Iron Phosphate) cells and the BMS (computer) the components are housed in a sealed battery case. There are no toxic chemicals or gases as in lead acid batteries. The batteries can be mounted in any direction; bottom or side. Compatibility - Our key concern in installing LiFePo4 batteries was compatibility with our existing charging systems and appliances. We discussed this at great length with our manufacturer. They reviewed the specs of each of our systems and gave us the thumbs up on compatibility. It appears they were correct as to date we have had no compatibility issues. Cost - LiFePo4 batteries are 3 to 5 times the cost of lead acid type batteries. Cost justification has to be based on convenience, performance and longevity. It haven't run the numbers yet but based on the number of cycles these batteries can support, there is a break even somewhere around 8 years not taking into consideration all the intangible benefits. Winter Storage - The LiFePo4 batteries can be stored in temperatures of 20 below zero. It is recommended that the negative terminals be disconnected so there is no chance of draining the batteries while in storage. The good news is that these batteries don't have to be removed from the boat in the winter. Bottom line - LiFePo4 marine batteries with the configuration we tested are lighter, can be drawn down 90%, hold a steady voltage, are plug compatible, and charge more quickly than lead acid batteries. They are nontoxic and safe. They are more expensive than lead acid. Contact me anytime to discuss how this technology might be applied to your marine application. Tom  This year we tested our new 175 Watt SunPower cell solar panel with our integrated water heating system on a 6 week cruise in Northern Lake Huron at a latitude of about 46 degrees. We used an EP Xtra-N 20 amp MPPT Controller. The 175 watt panel provided plenty of power to meet our 70 amp hour per day requirements. The 175 watt panel was mounted using our CMP pole mounting system so I could tilt and rotate the panel to achieve optimum sun angle. I set the sun angle once and rotated the panel three times a day (morning, midday, evening) and estimate we got about 30% more performance over a fixed horizontally mounted panel.
Operating statistics: Our power usage averaged approximately 70 amp hours or 850 watt hours in a 24 hour period. Our current draw was from a refrigerator/freezer running 24/7, our LED lights in the evening, cell phone chargers, laptop computer several hours a day and our radios and instruments during the day. Our windlass is only run when the engine is running so we don't include it in our power consumption calculation as the alternator quickly makes up for its power usage. We have a 75 amp Balmar alternator with a smart regulator. We changed our battery system this year by installing two 100 amp hour CMP LiFePo4 batteries for our house bank and one for our starting battery. I will post more about these batteries and our exciting findings soon. We started the engine to move anchorages about every three days. Results and findings: 1. Our battery bank was fully charged by 1 PM most sunny or mostly sunny days when at anchor. This is about the same charging time that we experienced last year with the 160 watt solar panel. 2. The EP Xtra-N MPPT controller with the remote display proved to be an outstanding piece of equipment. It was simple to program, easy to read, collected the appropriate data and was very efficient. It was exciting (I get excited about these things) to see 6 to 10 amps being poured into the battery bank in the morning. It would be frustrating to see it only outputting and amp or two in the afternoon in full sun but then you realize it is doing its job. It fully charged the batteries in the morning and was in float mode topping off the battery bank in the afternoon. 3. Because we have excess power in the afternoon on sunny days, we installed an inverter and purchased an ice maker. This turned out to be worthwhile purchase. Ice for drinks was a free luxury (power wise) that we really enjoyed. 4. Rotating the panel during the day, especially in the morning, significantly increased the power generation of the panel. 5. The data gathered confirmed that this panel configuration supplied all the power we needed and had excess capacity to catch up on battery charge after a string of cloudy days. 6. The panel was affected by shading as would be expected. Occasionally the panel was shaded by the back stay or the mast. While the shading was minimal, it degraded the performance by up to 40%. 7. We installed a new larger heat exchanger on the back of the panel for our water heating system This worked well on those sunny days so we had warm water for showers and dish washing. Power consumption of this system was minimal. Data: 175 Watt Solar Panel At anchor Motor Sunny to Cloudy to Mostly Sunny Mostly Cloudy Average watt hrs per day 750 480 900 435 Average amp hours per day 58 37 69 33 Maximum watt output in 24 hours 1,280 750 1,280 570 Maximum amp hours in 24 hours 98 58 98 44 160 Watt Solar Panel At anchor Motor Sunny to Cloudy to Mostly Sunny Mostly Cloudy Average watt hrs per day 660 480 700 400 Average amp hours per day 51 37 54 31 Maximum watt output in 24 hours 1,210 770 1,210 770 Maximum amp hours in 24 hours 93 59 93 59 Observations: 1. The minimum watt hour output doesn't mean much because it is dependent on both the cloud cover and the state of charge of the bank as a result of alternator charging, 2. The maximum watt hours per day of 1,280 is not the maximum output capacity of the system in a 24 hour period because the batteries were charged by 1 PM so the controller shut down the charge from the panel. A higher drain on the house battery bank would have resulted in this number being higher. 3. Average amp hours per day is computed by dividing the watt hours by 13 volts. This is a ballpark calculation. 4. This configuration proved to have plenty of capacity for our cruising needs even without using an auxiliary flexible solar panel we store under a bunk. We did not use shore power to charge our battery bank for the entire summer. Solar Water Heater: We installed our new solar water heating system. It consists of a heat collector or heat exchanger mounted on the back of the solar panel, and a circulating pump. See our earlier blog for design considerations. The pump circulates water from the water heater through the heat exchanger on the panel. We used the same configuration on our 120 watt panel last year. Results: On sunny days at anchor we had warm water for showers and dish washing. The water temperature in our 6 gallon hot water tank would warm from 60 degrees to about 105 degrees in 2-3 hours on a sunny calm day. As expected, we confirmed that strong winds tend to cool the panel and reduce the heating efficiency as do clouds. Overall, the water heating system cools the surface of the panel by at least 20 degrees. This increases the efficiency of the panel since solar panel performance degrades as they are heated by the sun. Insulating the tubing running between the heat exchanger and the water heater significantly increased the efficiency of the system. In conclusion, the radiant energy water heating system works well on sunny days with both our larger and our standard sized panels. See our product section or read our earlier blog for details. 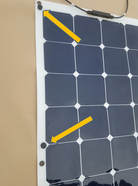 Solar Panel Attached to Canvas Bimini Using Rare Earth Magnets Solar Panel Attached to Canvas Bimini Using Rare Earth Magnets There may be times when it is desirable to mount flexible marine solar panels on a canvas bimini or dodger and be able to quickly and easily remove them. Our auxiliary solar panel mounting kit is designed for such an application.
One of our business associates, Ed Foster, came up with a brilliant idea for a mounting system that does not require you to put holes in your beautiful bimini or dodger canvas - high power rare earth magnets. Very high power rare earth magnets (up to 20 pound pull strength per magnet) are ideal for temporary mounting of our flexible solar panels on a canvas bimini or dodger. Our rare earth magnet kit includes 8 or 12 magnets and adhesive to attach the magnets to the upper side of the solar panel. Quality magnets are triple coated with a nickel-copper-nickel or an epoxy-copper-nickel coating. These magnets are also available with a plastic or rubber coating. We are testing various designs to determine resistance to corrosion in a saltwater environment. This is the big unknown. Using the magnet mounting kit is easy. Attach magnets to each corner of the solar panel and optionally attach two near the center of larger flexible panels using the included double sided adhesive tape. Position the flexible marine solar panel on the bimini or dodger and attach a mating set of magnets on the underside of the canvas. Connect the solar panel to the solar system using an MC4 T-branch connector. Store the panel under a bunk when not in use. We tested a set of these magnets on a 110 watt flexible panel during 6 week cruise in the North Channel of Lake Huron during the summer of 2018. We were in heavy winds and the panel did not move a bit. The magnets held the panel secure and there was no air getting under the panel to lift it. Custom Marine Products will be conducting three seminars at the Pacific Sail and & Power Boat Show in Richmond, CA April 20, 21 and 22. These seminars will provide an introduction to the basics of PV marine solar panel technology and how to apply this technology to design a solar system for your cruising needs. The seminars will also include a mini workshop in determining your electrical energy usage as a first step in designing a custom marine solar system. I have presented many of these seminars at various boat shows and they have been well received. No sign up is required. Just attend and enjoy.
The seminar material can be found on our website under SUPPORT, MANUALS & INFO, last item. Custom Marine Products has announced the availability of their new line of high performance marine solar panels. Made with high efficiency SunPower solar cells that have a rating of up to 23.7% efficiency, these panels and have the highest output power per square inch of any marine solar panels in the industry. CMP solar panels are built to withstand the rigors of the marine environment with fully encapsulated junction boxes and durable sealants and materials.
High performance marine solar panels are available in both rigid and semi-flexible versions. Two popular panels are the 175 watt 36”x37” rigid panel ideal for top-of-pole mounting and the 150 watt 21”x60” rigid panel ideal for mounting on dinghy davits. The new 120 watt CMP semi-flexible panel is ideal for mounting on bimini canvas or a curved hardtop. Available June 2018! *** 70 watt flexible solar panel with SunPower cells *** 140 watt rigid solar panel with SunPower cells This year we tested our new 160 Watt SunPower cell solar panel with our integrated water heating system on a 6 week cruise in Northern Lake Huron at a latitude of about 46 degrees. We used an EP Tracer BN 20 amp MPPT Controller. The 160 watt panel provided plenty of power to meet our 70 amp hour per day requirements. The 160 watt panel was mounted using our CMP pole mounting system so I could tilt and rotate the panel to achieve optimum sun angle. I set the sun angle once and rotated the panel three times a day (morning, midday, evening) and figure I got about 30% more performance over a fixed horizontally mounted panel.
Operating statistics: Our power usage averaged approximately 70 amp hours or 850 watt hours in a 24 hour period. Our current draw was from a refrigerator/freezer running 24/7, our LED lights in the evening, cell phone chargers, laptop computer several hours a day and our radios and instruments during the day. Our windlass is only run when the engine is running so we don't include it in our power consumption calculation as the alternator quickly makes up for its power usage. We have a 75 amp Balmar alternator with a smart regulator. Our house bank consists of 3 flooded cell batteries giving us a total capacity of 330 amp hours. We started the engine to move anchorages about every three days. Results and findings: 1. Our battery bank was fully charged by 1 PM most sunny or mostly sunny days when at anchor. This is in contrast to 2 PM in last year using our 120 watt panel on a pole. 2. The EP Tracer BN MPPT controller with the remote display proved to be an outstanding piece of equipment. It was simple to program, easy to read, collected the appropriate data and was very efficient. It was exciting (I get excited about these things) to see 9+ amps being poured into the battery bank in the morning. It would be frustrating to see it only outputting and amp or two in the afternoon in full sun but then you realize it is doing its job. It fully charged the batteries in the morning and was in float mode topping off the battery bank in the afternoon. 3. Rotating the panel during the day, especially in the morning, significantly increased the power generation of the panel. 4. The data gathered confirmed that this panel configuration supplied all the power we needed and has excess capacity to catch up on battery charge from a string of cloudy days. 65. The panel was affected by shading as would be expected. Occasionally the panel was shaded by the back stay or the mast. While the shading was minimal, it degraded the performance by up to 40%. Data: At anchor Motor Sunny to Cloudy to Mostly Sunny Mostly Cloudy Average watt hrs per day 1,047 645 700 220 Average amp hours per day 55 40 60 40 Maximum watt output in 24 hours 1,210 770 1,210 770 Maximum amp hours in 24 hours 100 64 100 64 Observations: 1. The minimum watt hour output doesn't mean much because it is dependent on both the cloud cover and the state of charge of the bank as a result of alternator charging, 2. The maximum watt hours per day of 1,210 is not the maximum output capacity of the system in a 24 hour period because the batteries were charged by 1 PM so the controller shut down the charge from the panel. A higher drain on the house battery bank would have resulted in this number being higher. 3. Average amp hours per day is computed by dividing the watt hours by 12 volts. This is a ballpark calculation. 4. This configuration proved to have plenty of capacity for our cruising needs even without using an auxiliary flexible solar panel we store under a bunk. We did not use shore power to charge our battery bank for the entire summer. Solar Water Heater: We installed our new solar water heating system. It consists of a heat collector or heat exchanger mounted on the back of the solar panel, and a circulating pump. See our earlier blog for design considerations. The pump circulates water from the water heater through the heat exchanger on the panel. We used the same configuration on our 120 watt panel last year. Results: On sunny days at anchor we had warm water for showers and dish washing. The water temperature in our 6 gallon hot water tank would warm from 60 degrees to about 105 degrees in 2-31-2 hours on a sunny calm day. As expected, we confirmed that strong winds tend to cool the panel and reduce the heating efficiency as do clouds. Overall, the water heating system cools the surface of the panel by at least 20 degrees. This increases the efficiency of the panel since solar panel performance degrades as they are heated by the sun. Insulating the tubing running between the heat exchanger and the water heater significantly increased the efficiency of the system. In conclusion, the radiant energy water heating system works well on sunny days with both our larger and our standard sized panels. See our product section or read our earlier blog for details. I am often asked how to best turn a marine solar system on and off and if doing so will damage the panels. Below are some thoughts: The solar controller is powered by your batteries, not your solar panels so you don't want to disconnect the controller from the battery bank to shut down you solar system as the controller will need to reboot and reset each time it is powered up. Rather, the proper way to turn off or shut down your solar system is by opening the positive wire from your solar array to your controller. We suggest a simple on/off switch in the positive wire from the solar array to the controller. Turning the solar array on and off with this switch will do no damage to the solar system. There is a reason it is desirable to be able to shut down the solar system with the switch or breaker between the solar panel and the controller. When charging off the alternator, you want maximum output going to the battery bank for bulk charging until the batteries are up to proper voltage. Some alternators, especially alternators with smart regulators sense the state of charge of the battery bank and determine to apply either a bulk or a float charge. If the panels are connected and producing, the regulator of the alternator will see the sum of the battery charge plus the solar charge coming from the panels. This apparent heightened state of charge may result in the regulator putting the alternator in float mode prematurely because it thinks the battery bank state of charge is higher than it really is. The same applies for the shore charger. This condition only occurs with certain combinations of alternator regulators, solar controllers and shore power chargers. Most of the time it is not an issue. Confused? As a general rule, to be certain of getting the maximum performance from your engine alternator and your shore charger, open the solar breaker when they are in use. Otherwise, experiment with your equipment and see if there is interference between the units as described above. If not, leave the solar system on all the time; that is what we do. 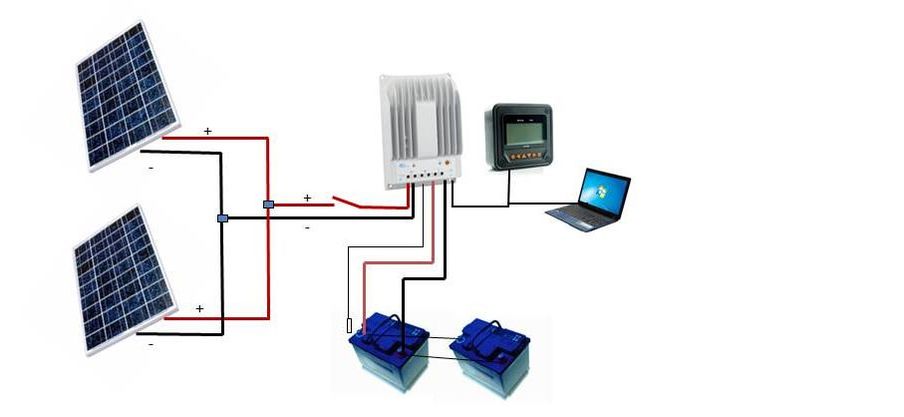 May 2017 Bruce Canavan Mariner 31 ketch - Letter to Good Old Boat Magazine I had been planning to add solar panels to my Mariner 31 ketch for some time but was having trouble finding a location that would work until I saw a dockmates side cockpit setup and decided right then to pull the trigger and get some ordered.
I got on Tom‘s website (custommarineproducts.com) and was amazed at the wealth of background and technical information available. He even has spreadsheets that will allow you to easily calculate the electrical loads for both stationary and underway situations, including various losses and reductions. Using this new found knowledge (a little being a dangerous thing) I ordered two 120 watt panels & a 20 amp MPPT controller with monitor. A couple of days later I got an email back from Tom as a follow up to discuss specifics on my planned setup. He suggested using two 10 amp controllers with separate monitors to achieve better output with the side mounts and mizzen shadow. In addition, he noted several fittings I had overlooked in the original order. He re-worked the invoice to provide the additional material with minimal additional increase in cost to me. Over the course of the next two months we maintained contact and Tom helped to resolve issues as I worked on the installation (a 13 hour round trip to San Diego where the boat is berthed slowed progress). Tom’s service is above and beyond any I have experienced. I have been recommending him with any responses I give at the dock regarding the installation. Great publication. Keep up the good work. Bruce Canavan |
Categories
All
AuthorThomas Trimmer has been cruising with his Ericson 38 sailboat on the Great Lakes for over 20 years. He has pioneered the use of solar energy for wilderness cruising. He is continually designing and building equipment to simplify and enhance the cruising experience. Archives
April 2024
|

 RSS Feed
Efficiently Powering Your Vessel/Van. Call/email/chat any time, we're happy to help you work through designing your solar system.
Home Page Solar Panels Mounting Kits Product Page Marine Solar Systems Gallery of Installations Customer Comments Contact Us
Call 248 705-8337 or email [email protected]
Article On How To Size Your Solar Panels For Your Boat
Customer Reviews Return Policy Privacy Policy Shipping Times/Rates
Home Page Solar Panels Mounting Kits Product Page Marine Solar Systems Gallery of Installations Customer Comments Contact Us
Call 248 705-8337 or email [email protected]
Article On How To Size Your Solar Panels For Your Boat
Customer Reviews Return Policy Privacy Policy Shipping Times/Rates